Tool 1 - delete results in a specific SCIA Engineer version
This tool is a Windows Command script that iteratively opens an esa file (SCIA Engineer file), delete the results from the file and saves the file under a new name.
Instructions
The archive contains following files:
- gvBatchDeleteResults.cmd --> the Windows Command script
- gvBatchDeleteResults_AddNode.xml --> the data file that is used when executing the script
Usage:
- Create an empty folder on your hard drive
- Copy the two file from this archive to this newly created folder
- Use a text-editor (like Notepad++) to edit the gvBatchDeleteResults.cmd and to configure which version of SCIA Engineer will be used to process the esa files
- Copy also the esa files that you want to process to the newly created folder
- Double-click gvBatchDeleteResults.cmd in this folder to run the Windows Command script
During the execution of the script, for each processed esa file, two new files will be created:
- File "<name of the original esa file>_noRes.esa" --> esa file without results
- File "<name of the original esa file>.log" --> log file with information
Description of the script
The script consists of 5 parts. You can modify Part 02 and Part 05 to configure the behaviour of the script. The other parts of this script should not be modified.
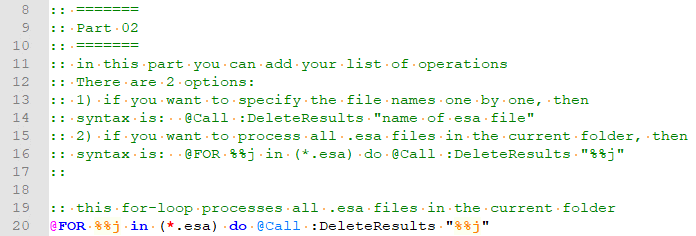
Part 02

You have 2 options here:
- Option 1: if you want to process all esa files in the current folder, then use the FOR-loop. This loop will iterate over all esa files in the current folder.
Example:
- Option 2: if you only want to process a subset of the esa files in the current folder, then you must call the DeleteResults-routine for each file separately.
Example:
Part 05

Here you can specify the location and version of the esa_xml that you are going to use.
Important
Since you are opening and saving each esa file, the saved esa file (i.e. the file without the results) will be saved in the latest version of SCIA Engineer.
Tool 2 - delete results in the original SCIA Engineer version
This tool will also delete the results from SCIA Engineer files, but instead of defining the SCIA Engineer version, the tool will check with which SCIA Engineer version the *.esa file is created and if that SCIA Engineer version is installed on the specific computer, file will be opened with that specific version (via the ESA_XML-routine) and the results will be deleted.
At the bottom of this page you can find the file runpy_batch_delete_results.zip
Unzip this file in the folder where you have SCIA Engineer files to clean.
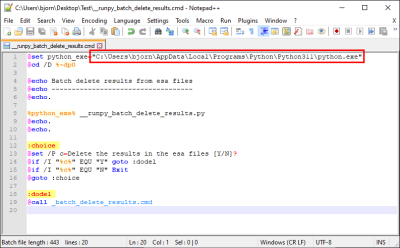
In the file __runpy_batch_delete_results.cmd you should define the correct path Python.exe:

Then you can execute the __runpy_batch_delete_results.cmd-file.
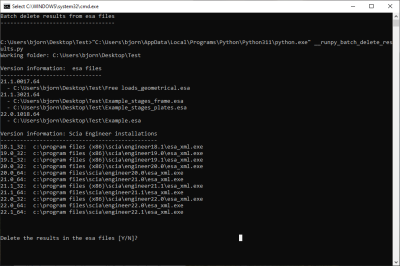
The routine will scan which SCIA-files are located in the folder and detect with which version they are created. This will be listed. The routine will also check which SCIA Engineer versions are installed on the computer.

If you proceed, the routine will open the files for which the SCIA-version is installed on the computer in that specific version (via the ESA_XML-routine) and delete the results. Files for which the specific SCIA-version isn't installed, will be ignored. As result you will become a new SCIA-file, for example Example.esa will lead to Example__noRes.esa. Afterwards you could delete the original files if you like.
At the top of the .py-script you can find some variables which you can modify (e.g. to search in subfolders, change the suffix of the generated files without results,...):
This is not official SCIA software and these community addons are delivered without any warranty or guarantee. So always verify the imported data. If you have any feedback, comments, requests, please feel free to contact us at our e-mail [email protected].
