Revit to SCIA: Cross-section mapping
This FAQ page explains how you can map the cross-sections from SCIA Engineer and link them to your own Revit families.
Profile library - Autodesk families
Cross-sections created via the profile library or the general families installed via the Autodesk website will be mapped almost automatically based on the 'shared' name. If multiple possibilities are found, you will be able to select the right one manually.
Examples
-
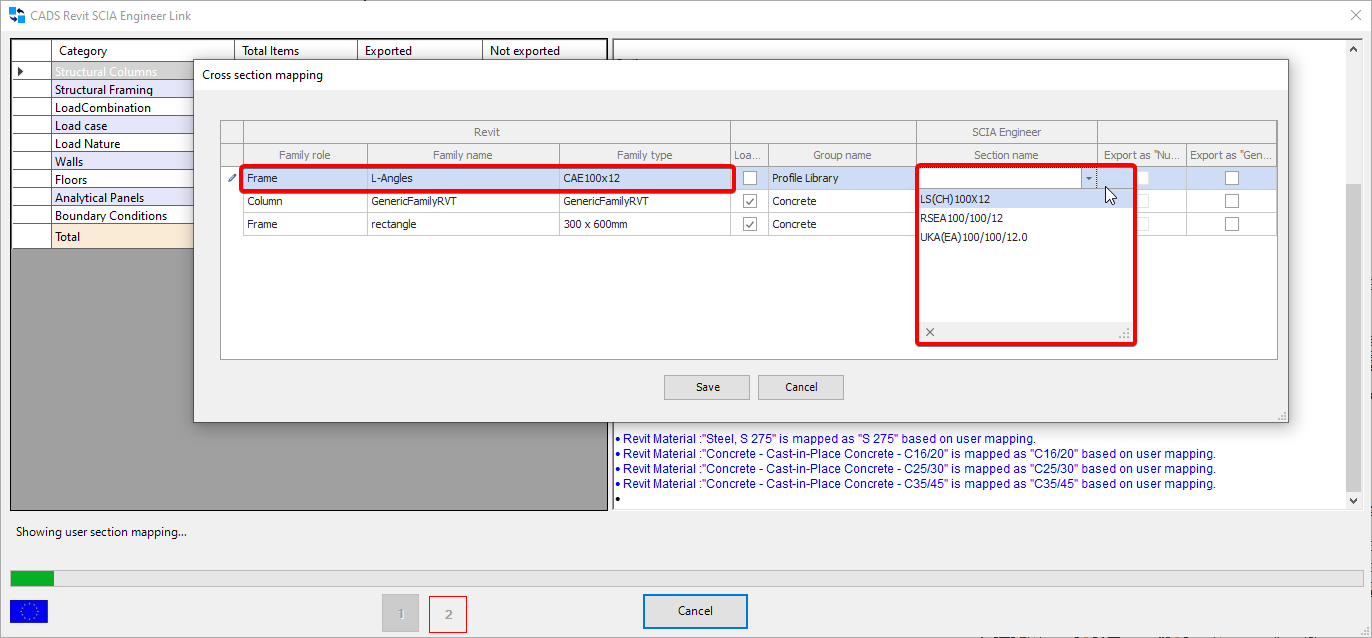
For the Revit family L-angles and the category CAE100x12, no exact match is found. During the export process, the mapping table is shown. Here you can manually select the correct SCIA cross-section. Based on the category and the naming, some options are proposed without showing the full library.

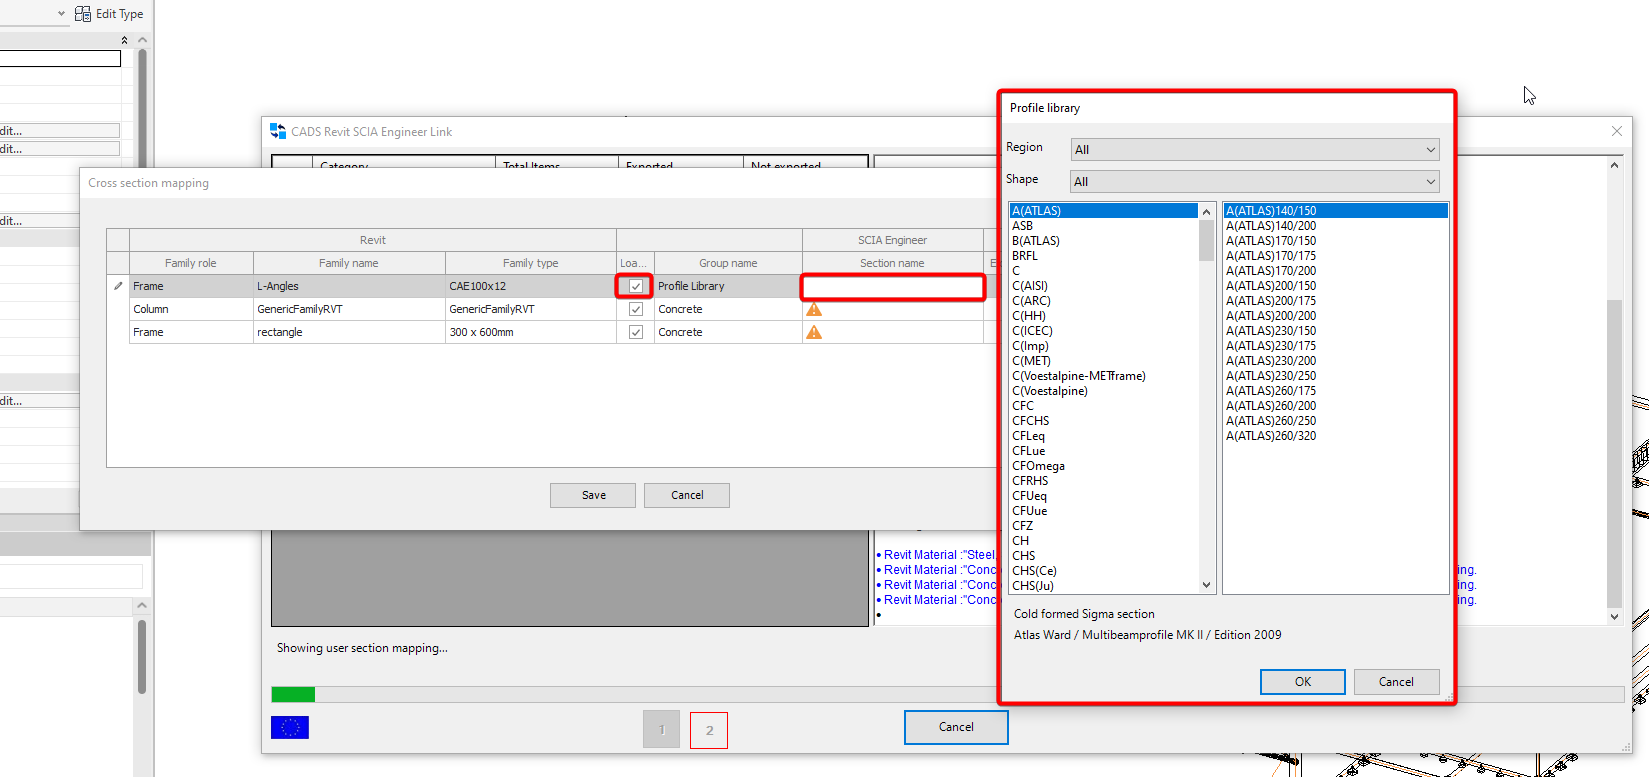
If you want to select a different cross-section than the proposed options, than you can activate 'load all' to select one of the sections from the full library. A selection made during this mapping process will be saved in the user mapping table, you will not need to select this the next time you make an export/import.

-
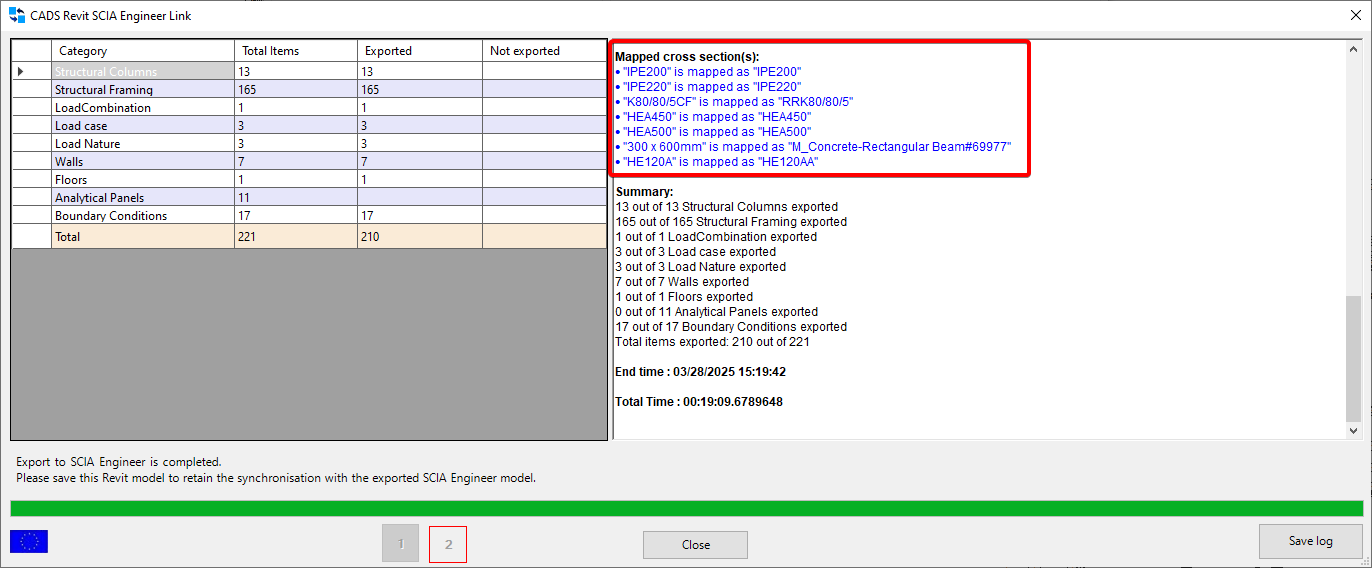
Most of these families will be mapped to SCIA cross-sections automatically. This mapping of these sections will be shown in the log file at the end of the export.

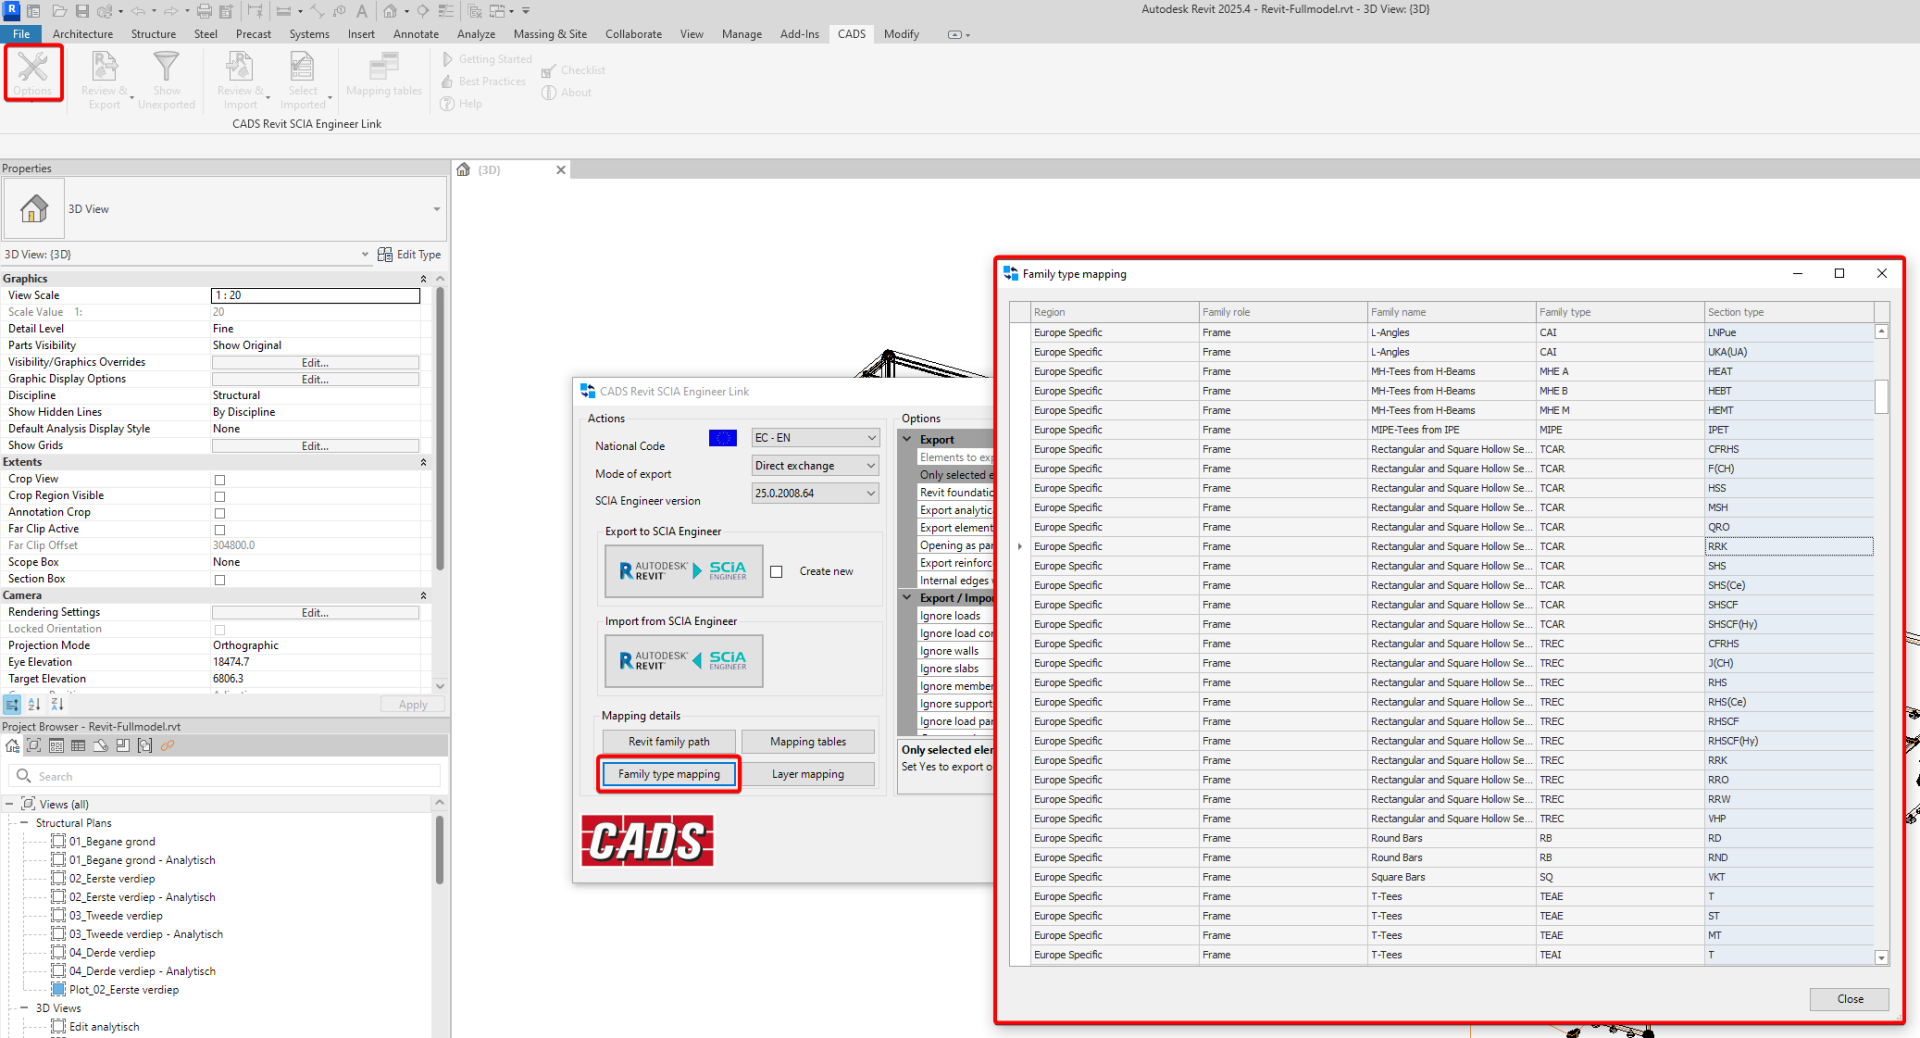
This mapping is based on predefined rules. You can check these rules via 'family type mapping'. These rules are fixed and thus cannot be edited.

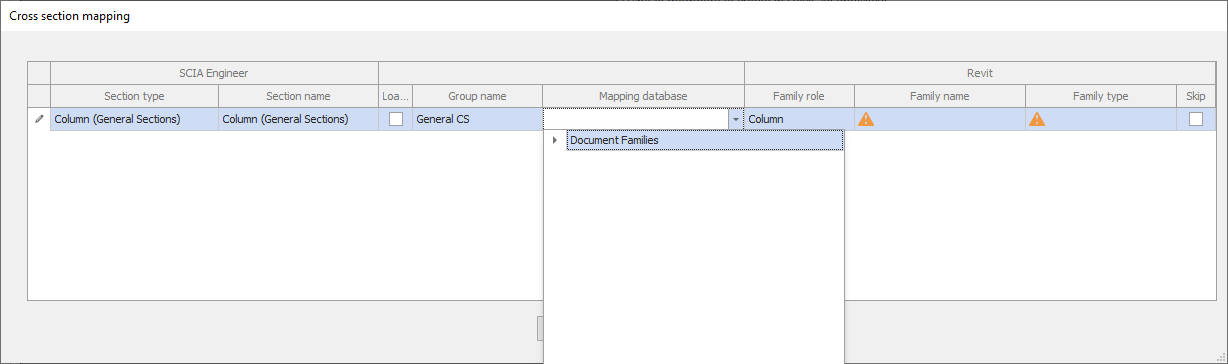
In the examples above, the mapping was done during the export/import of a model. It is also possible to create the mapping table beforehand via 'mapping tables'. In this dialog you can set the mapping for 'document families', meaning families loaded into the Revit project. You can link them to a SCIA Engineer cross-section from the profile library.
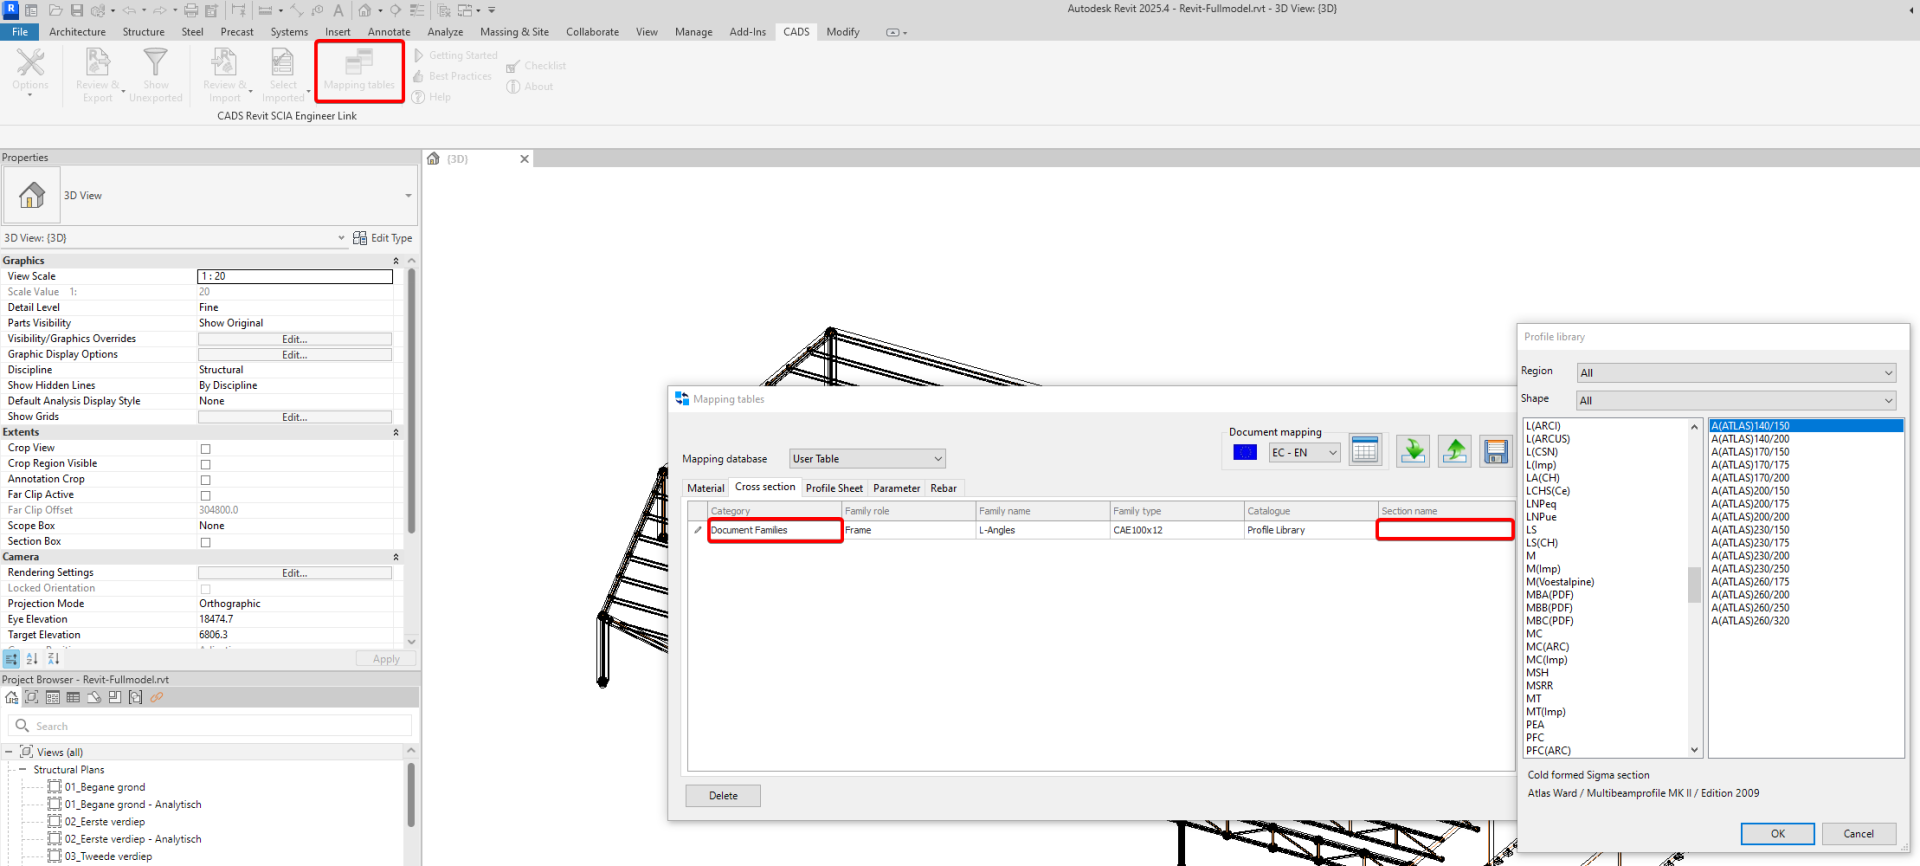
Instead of selecting 'document families' which need to be inserted into the project before the mapping process is started, it is also possible to add a path to the directory where your own families are stored. By doing so, you will be able to use your own families during the mapping process without the need to insert them beforehand. This will be explained in the paragraph 'Family path'.
Geometric shapes
Parameterized families from Revit can be transferred to SCIA Engineer as a geometric shape (concrete, geometric, thin-walled ...). During the mapping process, you can link the Revit family parameters to the SCIA parameters. Some default families of Revit are already linked with the correct parameters, for those you will not need to link the parameters yourself.
Parameterized cross-sections (geometric, thin-walled geometric...)from SCIA Engineer are linked to a default family from Revit and can thus be transferred to a Revit model. You will not need to link the parameters from SCIA to Revit.
Examples
-
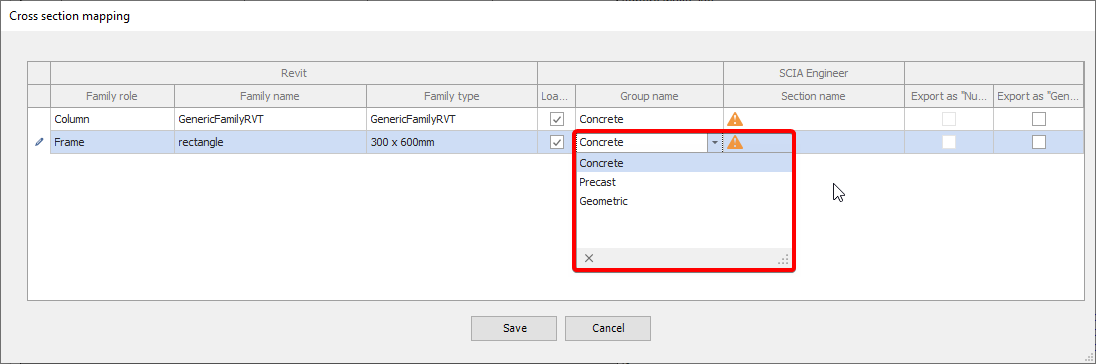
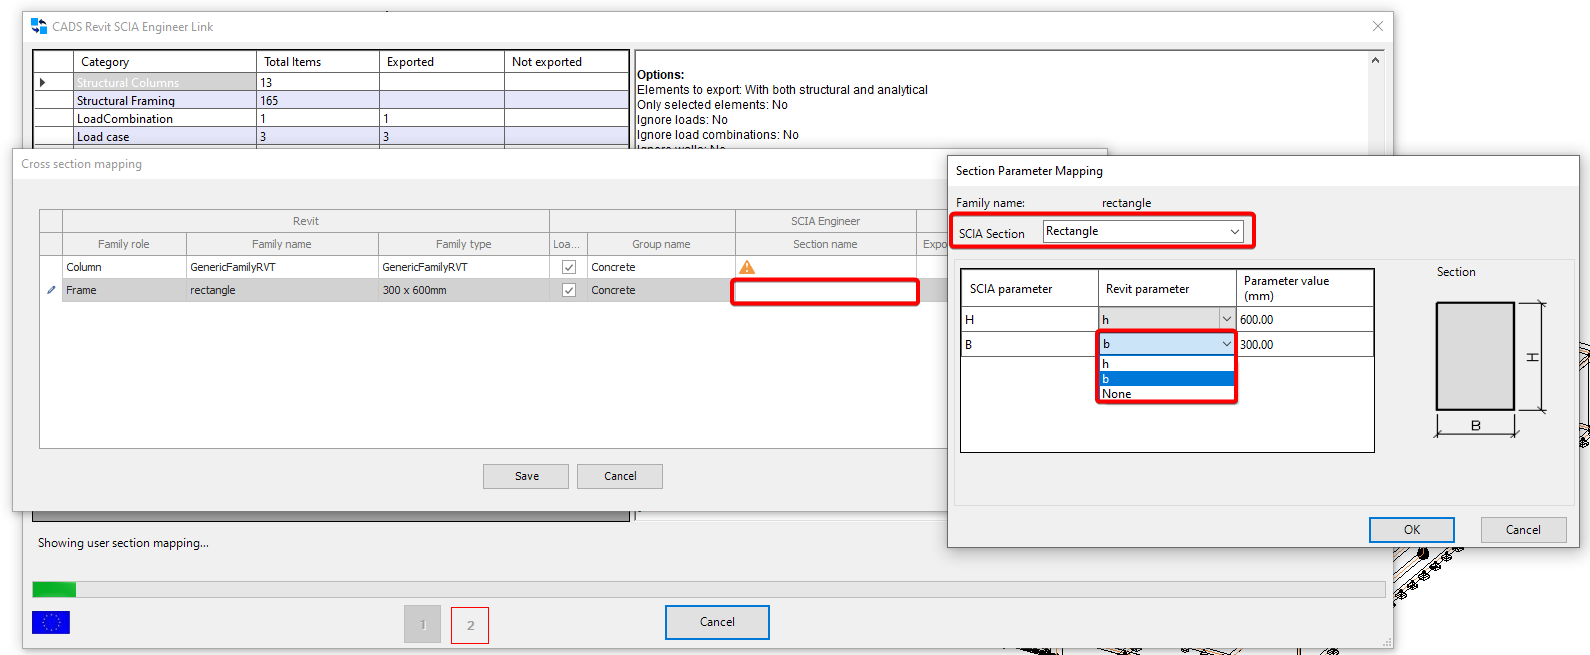
A rectangular Family used in a Revit model can be transferred to SCIA Engineer. During the mapping process, first select the correct type of cross-section. These types are preselected. For this specific family, only 'precast', 'concrete' or 'geometric is available. These options are based on the material.
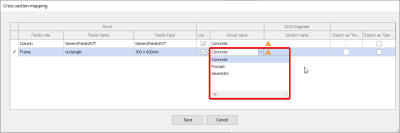

After selecting the right type, in this example 'concrete', you can click on the edit box 'section name' to select the correct shape and link the Revit parameters to those used in SCIA Engineer.

These settings will be saved in the user mapping table as well. This will be shown in the 'parameter' tab. It is not possible to create a mapping table like this beforehand. You will always need to do this during the export. When making the next export while using the same family, you will not need to map these parameters again.
-
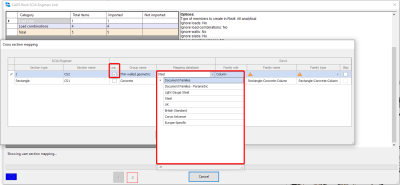
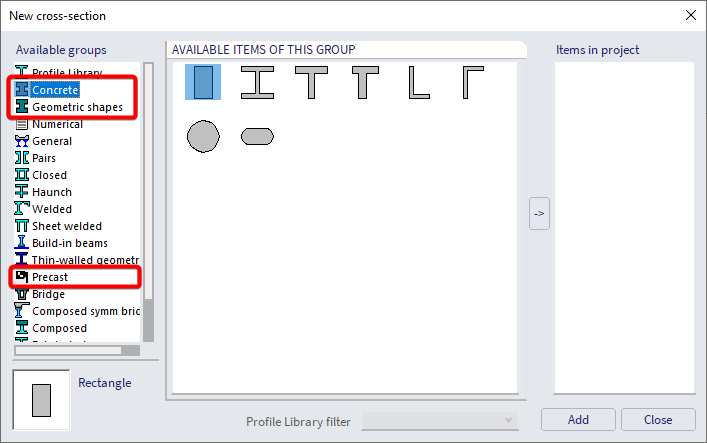
A Revit family with parameters but different material will have other cross-section types to choose from. In this case you will see that when 'load all' is activated, that options like 'profile library' and 'thin-walled' are available among some others. The procedure here is exactly the same as for the rectangular section. Select the wanted type, select the right shape and afterwards link your Revit family parameters to the SCIA parameters of this cross-section.

-
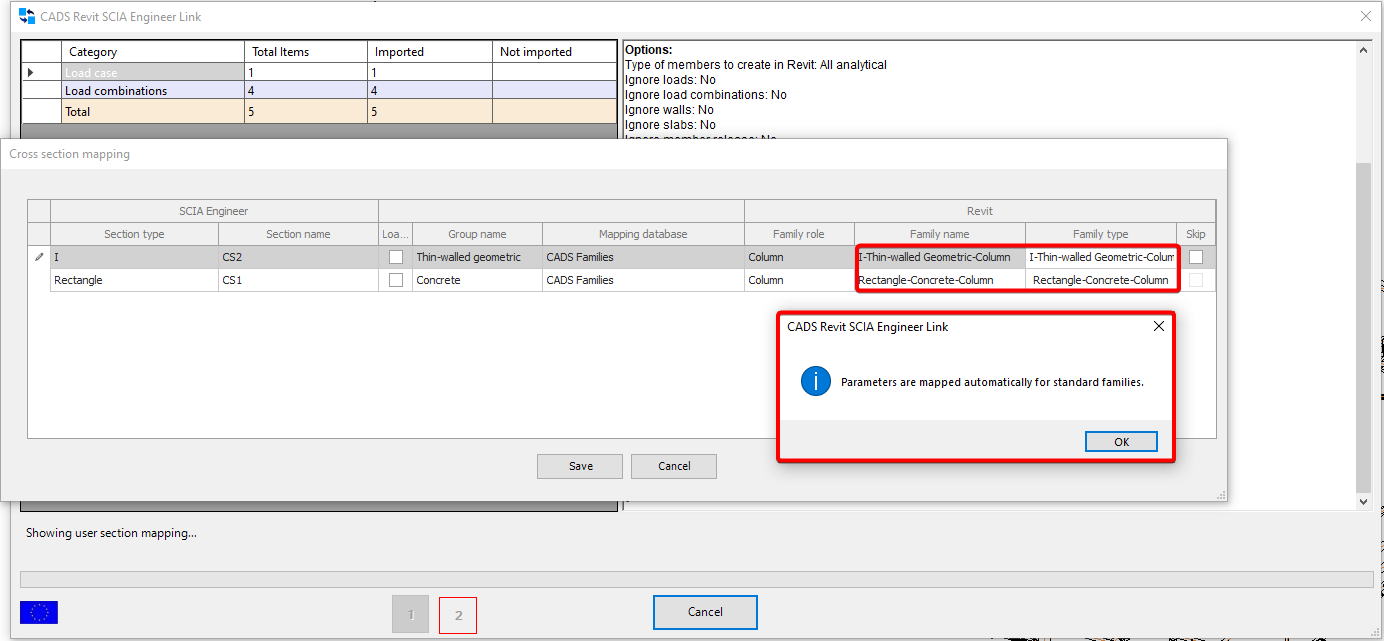
Cross-sections of SCIA Engineer from the type 'geometric', 'concrete', 'precast', 'thinwalled geometric' ... will be automatically mapped when imported into Revit. Those will be mapped without the need to link the parameters.

You do have the option to change the mapping. When you activate 'load all' you will be able to select a Revit family yourself. You can select either document families which you already inserted into the Revit model or you can choose from the installed Autodesk families.
Instead of selecting 'document families' which need to be inserted into the project beforehand, it is also possible to add a path to the directory where your own families are stored. By doing so, you will be able to use your own families during the mapping process without the need to insert them beforehand. This will be explained in the paragraph 'Family path'.


Export as general
During the export from Revit to SCIA, you also have the option to map a family as 'general'. In that case a general cross-section will be created in SCIA Engineer. The shape will be define based on the geometry of your Revit Family. The option to 'export as general' is only available when you use the 'direct exchange'. This mapping setting will not be saved, this option needs to be selected each time you make an export.
General cross-sections
When importing a model from SCIA to Revit which contains general cross-sections, you will need to map the general cross-sections during the import process. It is not possible to define this mapping beforehand. You will need to map the cross-section to one of the installed Autodesk families, an inserted document family which you loaded into the Revit project beforehand. The mapping settings will be saved in the user mapping table, the name of the cross-section used in SCIA Engineer will be used to recognize this.
Instead of selecting 'document families' which need to be inserted into the project beforehand, it is also possible to add a path to the directory where your own families are stored. By doing so, you will be able to use your own families during the mapping process of general cross-sections without the need to insert the families into the Revit project beforehand. This will be explained in the paragraph 'Family path'.
Family path
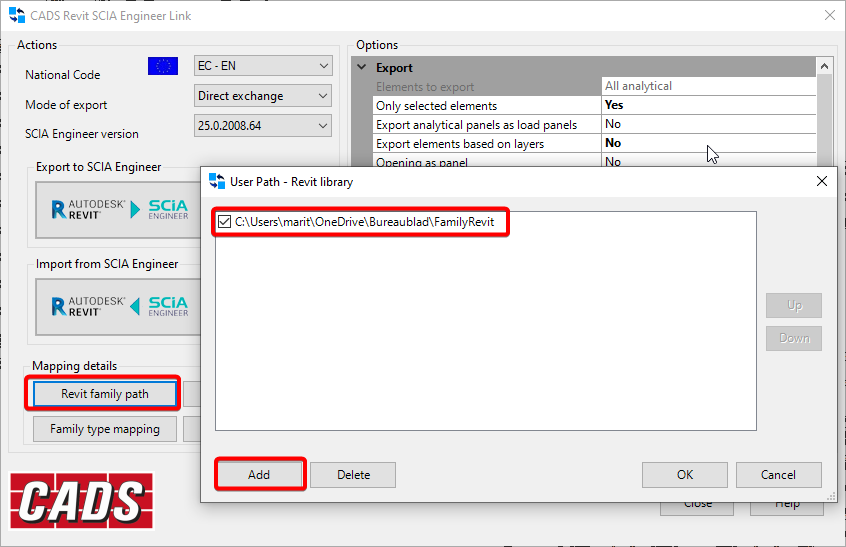
Whenever you make an import from SCIA to Revit, by default you can only select the installed Autodesk families or document families. Document families are families which are already present in the Revit project, they need to be inserted before the mapping process starts. Since inserting full families into a project can increase the file size and takes some time, you can link your own families to the Revit plugin.
To use your own families during the mapping process, you add a directory to the folder where your own families are stored via 'Revit family path'
To correctly find your own families during the mapping process, the folder structure will be important:
- The name of the main folder, to which you linked via the file path, is not important. This can be chosen freely. In my example, this main folder is called 'FamilyRevit'. You can create multiple main folders and add multiple file paths via 'Revit family path'.
- In this main folder, you will need to make a first subfolder. This subfolder will refer to the type of element created in Revit.
- For families which need to be used for beams, the folder 'Structural Framing' is created.
-
For families which need to be used for columns, the folder 'Structural Columns is created.

- For each of these subfolders, you will need to make a second subfolder referring to a category. There are a few categories which can be used:
-
'Steel'
-
'Light gauge steel'
-
'Concrete'
-
'Precast'

-
- In these folders (steel, concrete ...), you can add the family without subfolders. The only thing to keep in mind is that whenever you do not create any subfolders in here, that the added family is added to the category list. This can make it hard to find your own family in between the installed Autodesk families.
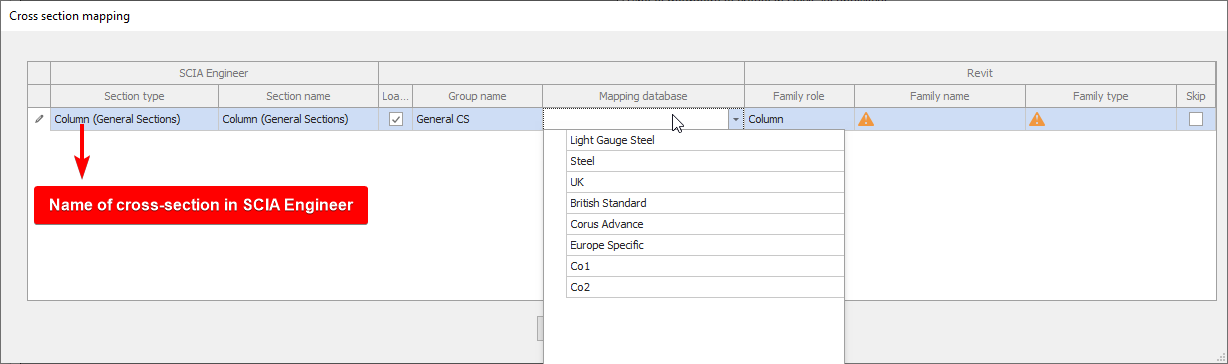
-
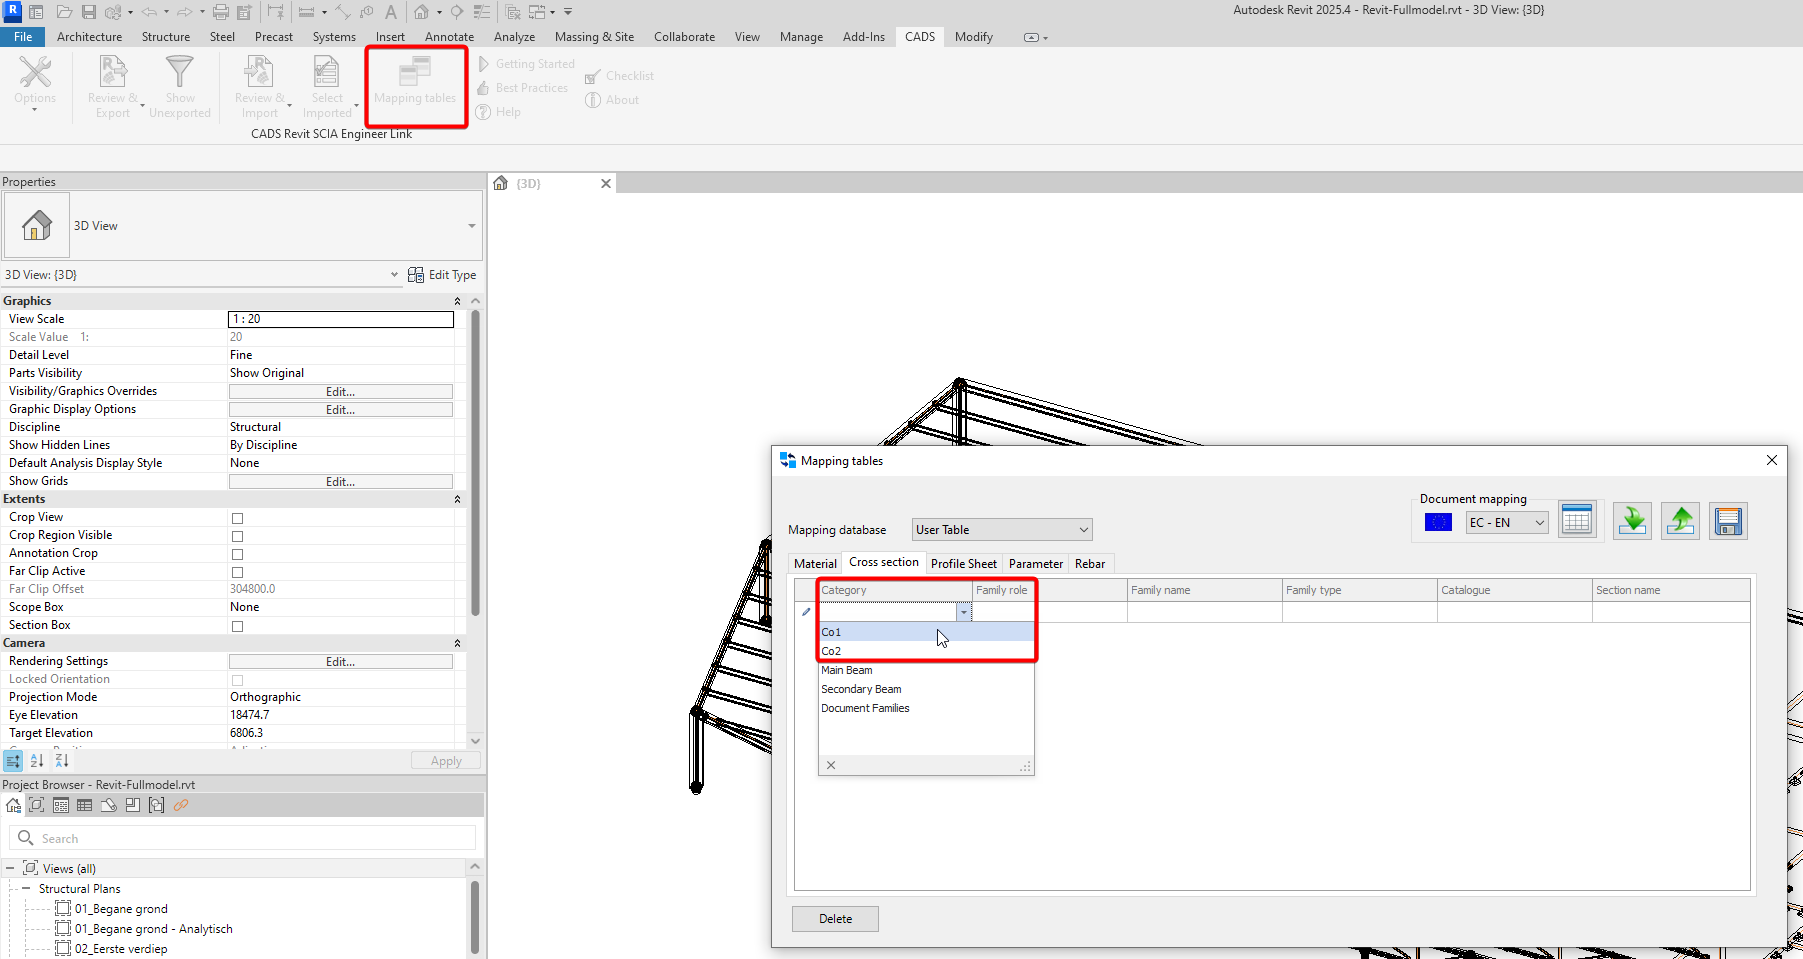
To add a new list with a new name, you can use subfolders in which you store the family data. In this example I created two different folders Co1 and Co2. In these folders, the family data is added with a .rfa file and a .txt file.


-
During the mapping process you will be able to find the used subfolders as a new category. After selecting the category, you can select the family name (more options will be shown when multiple different families are stored in this category folder) and the family type (when multiple types are available, you will have more than one option). You will also be able to find these families in user mapping table.


This folder structure is similar to how the Autodesk families are stored in the installation folder.